I've created a centralized blog which I call "The mosBLOG" where I will write about my various interests.
So all new updates for this blog will be at The mosBLOG.
Come for a visit, it'll be fun :)
Hope to see you there.
Much Love
Mosno Al-Moseeki
Wednesday, May 21, 2014
Monday, May 5, 2014
Portable Recording
Rehearsals are important, but your in a band with talented musicians who also perform with other projects, a "weekly" rehearsal time might not be in the works, enter Portable Recording.
This is a great way to record your practice sessions, and then you have something to listen to (which is rehearsal for the brain) until the next time you are able to meet up with your band mates. I do this all the time with my group The Greek Nubian Collective.
My weapon of choice is the Zoom H2N, this device is AMAZING! I absolutely love it. I haven't used ALL the features it provides just yet, but it is GREAT for recording on the go.
Here is how I use it:
We have 4 members in The GNC group, so we sit in 4 way compass style.
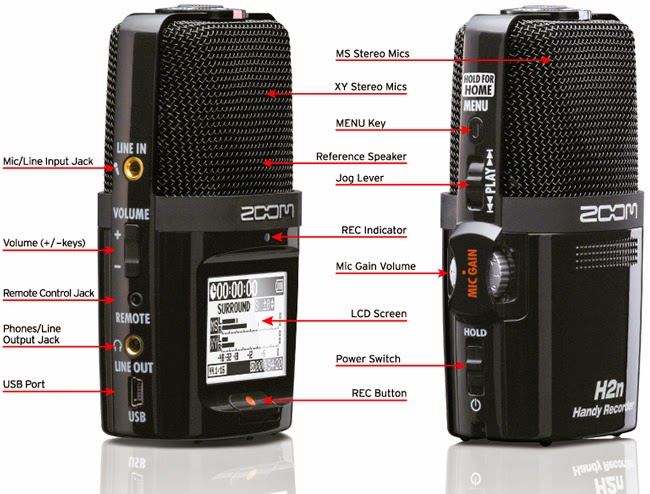 I would place the Zoom H2N in the middle, but here is the trick, I set it to the "4 CH" mode.
What this does is record from both sides of the micraphone, the 2 channels in the front, and 2 channels in the back, and then it saves each channel separately!
This is brilliant, because I can now place the percussionists on one side of the mic, and the strings/vocals on the other side of the mic, and by having 2 separate channels, I can adjust the the volume of each channel on its own in post-production.
I generally enjoy using Acoustica's MixCraft, because its good, cheap, and gets things done.
This technique has been very helpful, because it allows me to get a clear, clean audio of our rehearsals that I can share with the band, which we would listen to on our own time, until we can all meet again and improve on our performance the next time we meet.
I hope this was helpful, I'll blog you later.
Much Love
Mosno Al-Moseeki
This is a great way to record your practice sessions, and then you have something to listen to (which is rehearsal for the brain) until the next time you are able to meet up with your band mates. I do this all the time with my group The Greek Nubian Collective.
My weapon of choice is the Zoom H2N, this device is AMAZING! I absolutely love it. I haven't used ALL the features it provides just yet, but it is GREAT for recording on the go.
Here is how I use it:
We have 4 members in The GNC group, so we sit in 4 way compass style.
I would place the Zoom H2N in the middle, but here is the trick, I set it to the "4 CH" mode.What this does is record from both sides of the micraphone, the 2 channels in the front, and 2 channels in the back, and then it saves each channel separately!
This is brilliant, because I can now place the percussionists on one side of the mic, and the strings/vocals on the other side of the mic, and by having 2 separate channels, I can adjust the the volume of each channel on its own in post-production.
I generally enjoy using Acoustica's MixCraft, because its good, cheap, and gets things done.
This technique has been very helpful, because it allows me to get a clear, clean audio of our rehearsals that I can share with the band, which we would listen to on our own time, until we can all meet again and improve on our performance the next time we meet.
I hope this was helpful, I'll blog you later.
Much Love
Mosno Al-Moseeki
Friday, March 7, 2014
Guitar Pedals
I have recently been wanting to expand my performance a bit, for the longest time it has always been my acoustic guitar and I, we would hit the stage and rock out. Being a "techie" I'm always reading about the latest technologies and what using what ever tech I have around me to help me accomplish certain goals.
But there has been one thing that has always scared me a little, guitar pedals.
Oh man, I take one look at them and I start hyperventilating, you would think this gadget lovin, tablet wielding, technology blogging Sudanese rocker would feel right at home. Nope. The complete opposite.
They terrified me, they still do, but just a little bit less.
A few months ago I took a little ride with my good friend Athena, the front woman of Playground Etiquette. She was on her way to Atomic Music to pick up something and asked me if I wanted to tag a long so we can chit-chat on the way. I hopped in, and went over to this musician Toy Land.
We walked around and looked at all the cool stuff they have, she is an electric guitarist and vocalist, and is very comfortable with pedals and effects, and knows how to use them.
I on the other hand, had no idea what to even LOOK at.
But I took it as a sign to step into my fear and face it.
I grabbed one of the friendly workers and told him that I have been curious about experimenting with an effect pedal, something that is easy to use and possible has a looping feature.
He then presented me with The Line 6 DL4 Delay Pedal.
Awesome.
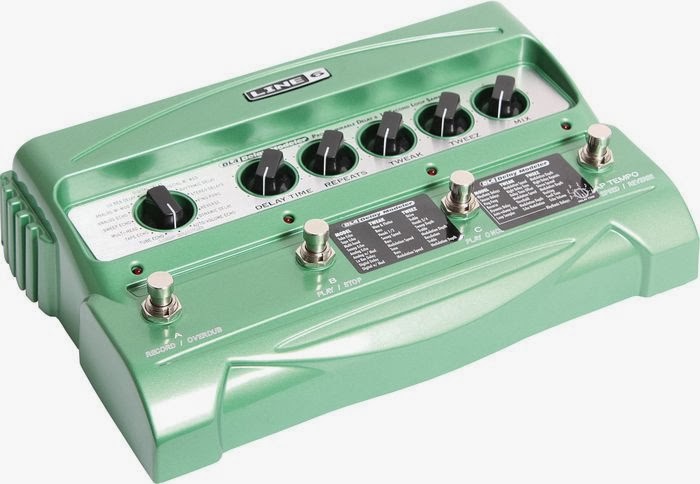
My first experiment with this was this past February. I had entered a friendly online songwriting competition, in which we had the 28 days of February to write 14 new songs, that was an experience all in its own, but I had decided to take this opportunity to use the Delay Pedal when I can.
I have to say, it did affect my songwriting on the songs that I used it in.
Heavy delays allowed me to create very moody atmospheres for songs, short quick ones allowed me to create something that moves quite faster than my normal writing.
I've used the Looping feature only once, one of the set backs is that when I'm in the Looping sections, I can't use the different delays, so if I want to loop different delays or sounds, they have to be external of the DL.
This made me bring out the custom pedal with has a delay and distortion created by my friend Jon P. and run it THROUGH the DL into my amp.
I have to say, this gets addictive!
Because I'm now thinking of other things to in corporate into this set up, including an Ebow.
Also, I've now started using my beautiful Epiphone Dot Studio guitar with this set up instead of my Acoustic.
Have I taken this out into the public? Nope. Or more correctly, Not Yet!
If you have been considering messing around with guitar pedals, I would say go for it. Choose something simple like the Line 6 DL4 Delay Pedal and see what will spark from there.
Don't be afraid to experiment.
Till next time, much love.
Mosno
But there has been one thing that has always scared me a little, guitar pedals.
Oh man, I take one look at them and I start hyperventilating, you would think this gadget lovin, tablet wielding, technology blogging Sudanese rocker would feel right at home. Nope. The complete opposite.
They terrified me, they still do, but just a little bit less.
A few months ago I took a little ride with my good friend Athena, the front woman of Playground Etiquette. She was on her way to Atomic Music to pick up something and asked me if I wanted to tag a long so we can chit-chat on the way. I hopped in, and went over to this musician Toy Land.
We walked around and looked at all the cool stuff they have, she is an electric guitarist and vocalist, and is very comfortable with pedals and effects, and knows how to use them.
I on the other hand, had no idea what to even LOOK at.
But I took it as a sign to step into my fear and face it.
I grabbed one of the friendly workers and told him that I have been curious about experimenting with an effect pedal, something that is easy to use and possible has a looping feature.
He then presented me with The Line 6 DL4 Delay Pedal.
Awesome.
My first experiment with this was this past February. I had entered a friendly online songwriting competition, in which we had the 28 days of February to write 14 new songs, that was an experience all in its own, but I had decided to take this opportunity to use the Delay Pedal when I can.
I have to say, it did affect my songwriting on the songs that I used it in.
Heavy delays allowed me to create very moody atmospheres for songs, short quick ones allowed me to create something that moves quite faster than my normal writing.
I've used the Looping feature only once, one of the set backs is that when I'm in the Looping sections, I can't use the different delays, so if I want to loop different delays or sounds, they have to be external of the DL.
This made me bring out the custom pedal with has a delay and distortion created by my friend Jon P. and run it THROUGH the DL into my amp.
I have to say, this gets addictive!
Because I'm now thinking of other things to in corporate into this set up, including an Ebow.
Also, I've now started using my beautiful Epiphone Dot Studio guitar with this set up instead of my Acoustic.
Have I taken this out into the public? Nope. Or more correctly, Not Yet!
If you have been considering messing around with guitar pedals, I would say go for it. Choose something simple like the Line 6 DL4 Delay Pedal and see what will spark from there.
Don't be afraid to experiment.
Till next time, much love.
Mosno
Monday, December 23, 2013
The Mini PA System
As I have mentioned in previous posts, I'm part of a cool acoustic duo called goatFISH, it is my self and the awesome artist Sahffi Lynne. What we bring to the stage are: 2 guitars, and 2 djembes (West African hand drums). What we need [especially if its a large and/or outdoor space] are 3 microphones & 2 guitar inputs. 2 of the mics are for our vocals, and the 3rd is for the djembe, which we pass between us, since we swap positions between guitar/vocalist & djembe/vocalist.
By band standards, we are a minimal set up band, Sahffi does have a 4 channel PA System, which works fine for us, but we still have to carry 2 large speakers, the speaker stands, and their cables and all that jazz.
And usually we do if we have too, but I'm all about troubleshooting those troubles :)
Earlier this month we had a show, the venue did NOT provide a PA System, since it was supposed to be an indoor "acoustic" set up, but they encouraged us to bring our own sound if we wanted, just as long as it wasn't going to be too loud. Sahffi's PA System, was NOT an option.
I don't know if you've tried this before, but playing guitar, djembe, AND singing at the same time, without microphones, is pretty pointless, you might as well just be a crazy person talking gibberish, because no one will listen to you. So we needed a way to amplify ourselves just enough to help people distinguish the sounds of all 3 elements.
Which lead me to rigging up what I now call "The Mini PA System".
It consists of 2 main things:
#1- A Micro 4 channel mixer.
#2- An amplifier with 2 inputs.
Here is how it works.
The Micro 4 Channel Mixer
-Using 2 XLR to 1/4 cables, I plug in 2 vocal mics into 2 of the channels, that way each of us has a dedicated vocal channel which we can adjust the volume of.
-The other 2 channels are for our 2 guitars.
-The "Output" of all 4 channels, goes into "Input 1" of the Amplifier.
So this would mean that all vocals & guitars are now amplified through one input, and can be adjusted individually.
The 2 Input Amplifier
-Input 1: is amplifying the signal from the Micro 4 Channel mixer (Vox & Guitars).
-Input 2: the mic for the djembe.
Keep in mind that the Amplifier has individual volume control for each of the inputs, so we now have total control of the volume of all the elements with only 2 main components.
Needless to say I've tested this out in my room, and it worked like a charm.
I tend to favor this kind of set up, especially if its a low profile gig that just needs that little extra push, in order for you to be heard clearly, and without straining your voice.
I hope this was been helpful.
Until Next Time.
Much Love
Mosno Al-Moseeki
Wednesday, December 4, 2013
Game Audio 3/3 : DIY Recording
Recording is one of the most fun parts of working with audio in my opinion, there are SO MANY ways you can do it. I know that the idea of recording may seem intimidating, but have no fear, I'm here to help, and have you look at it in another light, a fun creative light.
In the past when you hear the word "Studio", you tend to think of a big space, with a huge soundboard, and glass separators, those still do exist if you need or want them. But now in 2013 (soon to be 2014), all that is somewhat in the past.
Enter; DIY Method.
DIY (Do-It-Yourself) is an indie artist's best friend, it really helps you change the way you think of what is really needed, and forces you to be creative AND gives you great results as well.
To have a successful recorded track you need 2 things.
1- Software
2- Hardware
If you have one of each (that work together), then you are good to go.
I'll prove it to you.
Software:
It is wise to use a multi-track recording software, that way you will have the ability to have more than one layer on a single track, which will give you a richer sound.
If you are a MAC user, most of them already come with "Garageband" installed, its actually a great tool.
If you are a PC user, there is a great and cheap alternative called "MixCraft" by an indie company called Acoustica, its basically Garageband for PC, and you can get a perfectly functioning version for about $80, you can even try it for free for 14 days before hand.
Hardware:
A simple usb midi keyboard would do just fine.
I have an M-Audio Oxygen 8 small keyboard, with some search online or your local music store, you can get one for about $80, or a used one for less than that.
Your probably thinking: "Really? Do you think that would really work?".
Yes! you know why? because I successfully created Game Music (& got paid for it) using an old Mac that had Garageband & that Oxygen 8 keyboard, and you can hear those songs on the music page of this blog.
///
Like any other profession, the more audio toys you have, the more complex you can get with your production, and the more fun you will have doing it.
For Example.
I have a little acoustic duo called goatFISH with my musical partner in crime, artist Sahffi Lynne. A couple of years ago we decided that we wanted to record a small 5 song EP of our music. We are both busy artists, so it had to be done on a flexible schedule, so we decided to do it ourselves. She had the space, and I had the technology, so we set up a DIY Recording Studio in her basement.
This was my set up:
Hardware: Zoom R24 (portable multi-track recorder), Instrument & Vocals mics, Mic stands.
Software: Mixcraft 5 to edit and manipulate the audio after recording.
That was it.
We would use the Zoom R24 to record what we needed to record, I then would dump the WAV files into my computer, and use Mixcraft to edit, mix, and even used a "Mastering" filter to help keep the volume of all the track close to each other.
The end result is our EP >>> goatFISH : The Gift of The Nympth
///
You can even go super DUPER indie if you needed (or wanted to).
I remember at one point I needed to do a quick recording of a few songs, but had no money or access to a studio, so I used what I had in my room.
Software: Audacity (yup, the free audio recorder)
Knowing I can't do multi-tracking well with this program, I needed to find a way to record both guitar & vocals at the same time, and have them both sound clean. So I did this:
Hardware:
-I grabbed my 4 Channel Micro Mixer ($30), this has 4 quarter inch (1/4) inputs, which allows you to adjust the volume of each one separately.
-Plugged my guitar into one channel.
-Plugged my microphone into a second channel (using an XLR to 1/4 cable)
-Plugged the "Output" from the Micro Mixer into the "Mic-Input" of my laptop (using a 1/4 to Headphone Jack size 3.5mm adapter on the Laptop's end)
I then simply adjusted the settings in Audacity to pick up what ever is coming in from the laptop's Mic Input, and viola! Instant Indie Recording Mechanism.
I adjusted the volume of the guitar & microphone to my pleasing (because I can only get one take per recording), hit record and did my demo.
Worked like a charm.
///
So you see, that is the beauty of DIY Recording, you can find all sorts of fun and cool ways to get the job done, in fact my latest album NOVELLA which I will be releasing in 2014, was recorded DIY Style, and it sounds AMAZING. You can even watch how we did it at the Making of Novella vLogs.
I say give yourself some credit, and try it out. If you put enough time and imagination, you will be recording sounds and music in no time, and you will have a blast doing it too :)
I hope you enjoyed these short 3 posts about Game Audio, let me know if they were helpful
Till next time.
Much Love.
Mosno
Thursday, November 21, 2013
Game Audio 2/3 : Atmosphere
Games are not just games anymore, they are elaborate pieces of art and should be treated as such. Many games have story lines, they can range from very simple to very complex, so I like to treat them as such. There is a book called "Sound Design: The Expressive Power of Music" by David Sonnenschein, true, the book is talking about Music in films, but the knowledge in it can be easily (& successfully) transferred into Game Audio.
There is a part in this book when the author provides you a part of a screenplay, which describes a scene & then asks "What to listen for?". Its quite brilliant really.
In that example 4 main things will help enhance the Audio aspect of that scene (or in our case, level)
1- People, objects & actions.
2- Environment.
3- Clues to the emotions.
4- Physical or dramatic transition.
Here a scene for us to work on.
Lets say the level you are working on has your main character running (people) on a grassy field (action) towards the town's ringing bell (object).
Lets use the above theory to break the scene down for sounds:
1- People, objects & actions
Just by this description, you would like to have 3 things:
-Panting, the fast breathing sound of your character (people).
-Squishing, the sound of feet on grass for the running part (action).
-Bell, different volume levels of a bell (object), I say different levels because you can use the volume to provide the aspect of distance to the player, plus this will come in handy in the future I promise, stay with me.
2-Environment
Obviously it is outdoors, now we have to determine a few other things:
-Is it day or night?
Both characteristics have different sounds associated with them.
If its "Day", we can add sounds of birds for example.
If its "Night", we can use the sound of crickets and/or frogs.
-Are there any special features near by this grassy meadow that make sounds?
Trees?, add the sound of leaves softly blowing in the a breeze.
A stream?, the sound of softly running water.
An active volcano, have some rumbling sounds that appear now and then.
3-Clues to emotions
This is a little tricky, because in a way it kind of merges into the "Environment" but in deeper detail. We know that the character is running towards the town's ringing bell. Lets say its Day time, why is the bell ringing? lets say its indicating the beginning of the business day.
The emotion here should be something related to Hustle & Bustle, so you would create the sounds of the town to convey that emotion, for example:
-Many voices talking at the same time, or making phonetic sounds as if they are talking.
-Should be in a mid-rang pitch, with some minor high & low voices.
-If there are people on bicycles weaving by.
-If the ground that people are walking on is concrete or stone.
ect...
4-Physical or dramatic transition
You have to let your player/audience know that they have entered, or transitioned, into a new "Space". We just had a character "transition" from two places with different sound needs.
Place One: The Grassy Meadows
Place Two: The Town
Transitioning from Place One to Place Two should work with the "Game Play" of the level:
A)-Is there a gate that the character has to walk through to get into the Town?
B)-Or is the Town open into grassy meadows with no barrier?
If its option "A".
Then thats easy, you will just need a sound for the Gate, then the sounds will change once your character enters, or transitions, into the new space.
If its option "B".
Then you will need to mix the audio a little, allowing the sounds from the Grassy Meadow to slowly fade out, while simultaneously increasing the sound of the Town.
This mixing should be determined by the distance of your character to the town.
Remember the "Bell", the Object from the #1 section? Remember how I was recommending to have different levels or volumes of the Bell to determine distance?
Well, this is where it comes in handy, as you find your self using the louder levels of the Bell, that would mean that you are closer to the town, therefore you can use that to help you decide when to start fading out the sounds of the Grassy Meadow.
I hope this has been helpful, my next and final post on this short Game Audio series, will be about recording, and how fun and easy it can be.
Till next time.
Much Love
Mosno
Wednesday, November 20, 2013
Game Audio 1/3 : Design
Notice that these posts are called "Game Audio", not "Game Music".
One of the tiny problems with young game creators, is that they don't really think about the "Audio" for the game they are planing to create. I think people believe that by licensing a song from an artist will simply solve the "Audio" part of the game, but that is not true.
Music is just one part of the audio, you then have to think about the surrounding sounds. The sounds of the foot steps when your characters move, the sound if your characters pick up things, or hit something. Heck, the sounds at the menu selections.
While I was getting my Bachelor's degree in Simulation & Digital Entertainment at the University of Baltimore, I ALWAYS ended up being "The Audio Guy", namely because I'm also a musician. I to used to think that just making music was all that was needed, boy was I wrong.
Game companies would value you more (and actually want) not just a composer/performer, but also a Sound Designer. One of the projects I was working on during my college days at UB, was an educational game called "Oppie The Otter" for a Fredrick County Health Education project. This otter character would have to jump into the water, swim, pick up food, (that's 3 sounds right there), say things (that's voice over), and then there was the background music for the game.
And yes I did all of it, including the voice of the otter, it was...interesting :)
With a little imagination, and computer software, you can manipulate sounds and create SO many things, not only that, its actually a lot of fun.
I will talk about recording audio DIY Style in an upcoming post in this series.
So if your thinking of creating a cool game, please don't underestimate the power of Audio.
If your thinking of doing Game Audio, don't underestimate all the sounds around you.
Till next time.
Much Love.
Mosno :)
Subscribe to:
Posts (Atom)